The newness of it

It snowed here the night after Christmas. I gazed out the nursery window, watched flurries crossing the beam of a streetlight, as I rocked Lucy to sleep. The snow didn’t last, but it nicely punctuated the end of her first Christmas. As we rocked, I imagined what it would be like next year to bundle her up and take her out into the quiet white, to see her cheeks turn rosy and hear her laugh, screeching and delighted, at the newness of it. The thought made my eyes water and my heart ache. Oh, this love! It is heavy, heavy, heavy.

Since Lucy’s arrival, I have found myself looking forward to holiday traditions with an excitement I haven’t felt in years. Having a child has made me want to carve jack-o-lanterns, cut hand turkeys, and hang Christmas lights. All of these rituals are novel to my girl; when she encounters something new, she opens her bright eyes so wide and just stares, so intently, her mouth open and curled up at the corners, her hands reaching out–and then she smiles like the ocean, vast and beautiful. I can’t get enough of that smile.

And so we do things to make her light up. We gaze at decorations in the mall, we wrap presents in crinkly paper, we hang the tree with shiny things. We even made Christmas cookies this year. I can’t remember the last time I did that.

IMG_2352

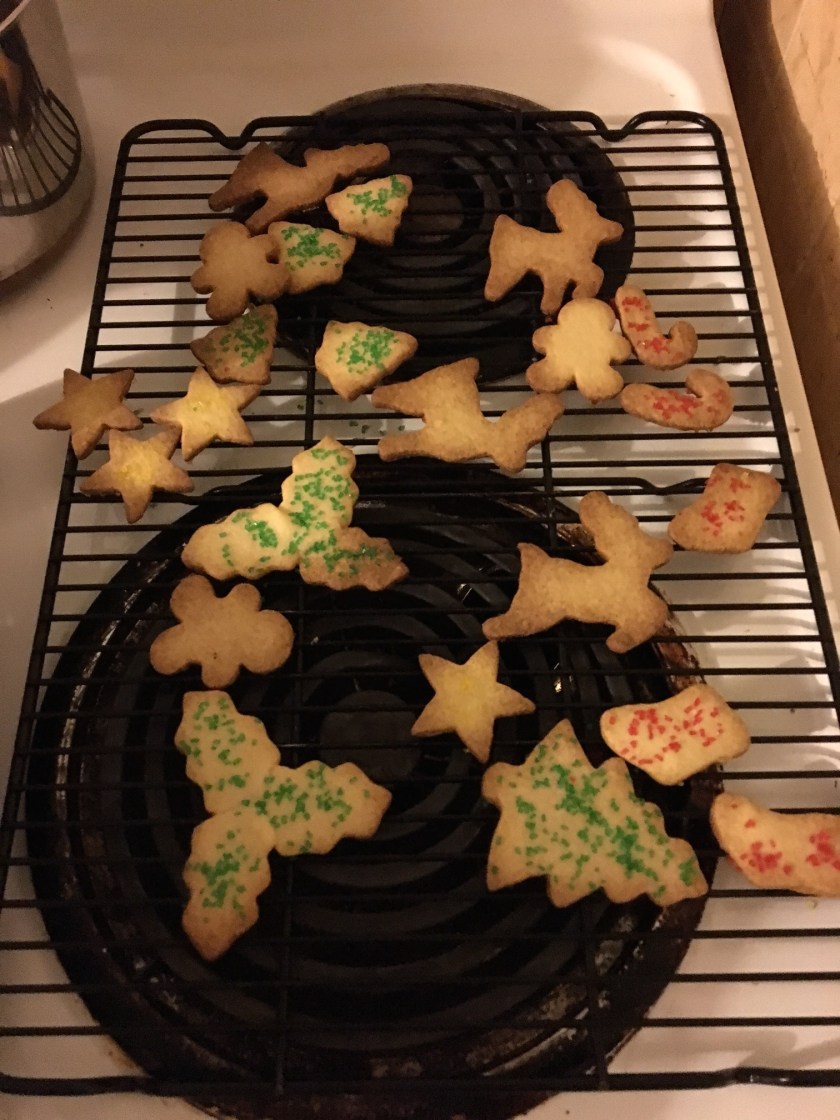
I envisioned a cozy afternoon of baking, with Lucy cooing underfoot, a cup of milky tea in my hand, Christmas carols on the record player, and dozens of perfect cookies coming out of the oven at regular intervals. It did not, of course, play out quite like that. Lucy was fussy and uninterested in a nap, toys, or being put down. My tea cooled quickly, shoved aside to make room for measuring, mixing, flouring, and rolling on my impossibly narrow block of usable counter space. I forgot about the music. But it didn’t matter. We made those cookies. They were delicious. And now we have the tools and foundation for another new tradition.

Life is much more disorderly and unpredictable now. As someone used to being in control, I am hit with that realization again and again. The feeling is new and confusing–and pretty great, too; it is a little like falling and a lot like flying. It feels good to become less rigid, to bend and reshape parts of myself to make space for someone else to grow alongside.

I can’t wait to see the mess we make next year.

IMG_2338
Batch no. 1 burned as I frantically rocked Lucy, trying unsuccessfully to get her down for a nap while the oven timer beeped with increasing insistence.
IMG_2339
Batch no. 2, following the failed nap attempt. I was slinging sprinkles over my shoulder while dodging blows from my overtired baby.
FullSizeRender
Batch no. 3, looking presentable. Lucy had succumbed to a nap at last, and I had traded in my cold tea for a glass of wine.

Christmas Cookies

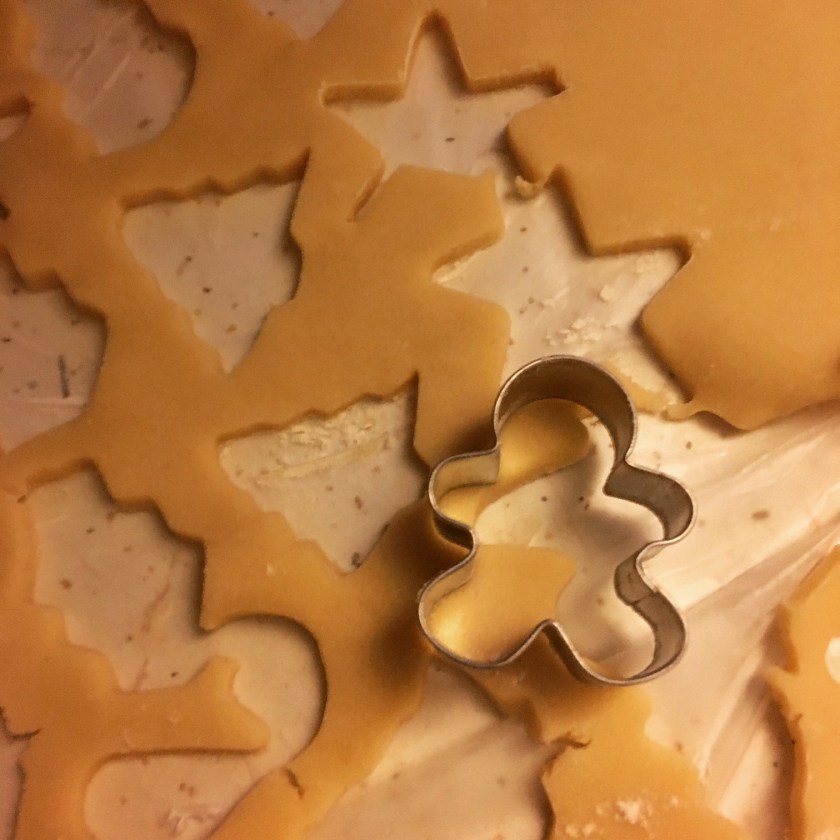
I didn’t own any cookie cutters and had to go buy some, along with sprinkles and a fresh bag of sugar. I also didn’t have a recipe and ended up using the one on the back of the cookie cutter package because it called for both vanilla and almond extracts, all butter, and ominously warned me: DO NOT CHILL DOUGH. The resulting cookies were crisp and lightly sweet. I think next year I will try adding lemon zest for a little tartness.

You will need:
2 3/4 cups all-purpose flour
1 tsp baking powder
1 tsp salt
1 cup (2 sticks) unsalted butter, softened
1 1/2 cups granulated sugar
1 egg
1 tsp vanilla extract
1 tsp almond extract

Preheat oven to 350º. Mix dry ingredients together in a medium bowl and set aside. In a large bowl, beat together butter and sugar until fluffy. Add the egg and extracts to the butter mixture and beat until well incorporated. Add 1 cup of the flour mixture and mix to combine. Continue to add the flour mixture gradually, mixing after each addition. The dough will become quite thick, so you may find a wooden spoon or spatula to be a good tool if your hand mixer fails you.

Divide the dough into two balls so you have a manageable amount to work with. Do not chill. On a floured surface, roll one ball of dough at a time out to 1/4″ thickness (or a little thinner if you prefer a crisper cookie). Dip cookie cutters in flour to prevent sticking. Cut dough into desired shapes and place on an ungreased cookie sheet. Bake 8-12 minutes. Cookies should be very lightly golden-brown on the bottom and sides.

A game of transformation

Creating meals from leftovers brings me tremendous satisfaction. Neither Mike nor I enjoy eating leftovers because we like variety and lack a microwave are spoiled rotten food snobs. (I will say, however, that our privileged palates have been humbled somewhat by the arrival of Miss Lucy. We are learning that when you’re exhausted and it’s late and you have to work the next day and your baby may wake up wailing at any moment, leftovers are not beneath you. Neither are scrambled eggs, takeout, or cold cereal.) And although I dislike leftovers, I despise wasting food. I cringe, feeling guilty and incompetent, as I toss wilting vegetables and week-old spaghetti into the smirking maw of the compost pail or, worse, the trash can. So, when the guilt is too strong, I summon the creativity that survives in me, somehow, suppressed as it is by worry and perfectionism, and make a game of transformation, turning leftovers–presto, change-o!–into something new and tasty. It brings me such joy and makes me feel a little like Harry Potter.

One of my best tricks is homemade pizza. You can put almost anything on pizza crust, blanket it with mozzarella, and have yourself something really good for dinner. The other night I did just that, combining mushrooms, peppers, and slivers of red onion with some slightly gray coppa salami that had been loitering in the meats-and-cheeses drawer of the refrigerator. And even though I knocked my prep bowl of finely chopped herbs and garlic on the floor and had to use garlic powder and dried herbs on the crust instead, even though I accidentally sprinkled the crust with dry mustard instead of that garlic powder and then had to scrape it off, cursing, the pizza turned out great.

IMG_2240

I found a no-yeast crust recipe a few years ago and have been using it ever since. The flavor and texture are more like flatbread than pizza crust, but the dough is quick and easy to make, so it works well for weeknights.

No-yeast Pizza Crust
adapted from bettycrocker.com

You will need:
1 1/3 cups all-purpose flour
1/2 tsp baking powder
1/2 tsp kosher salt
1/2 cup milk
2 tbsp olive oil

Preheat oven to 400º. Mix together dry ingredients. Stir in milk and oil to form a soft, sticky dough. You can add a touch more milk if the dough is too dry. Knead dough 10 times on a floured surface. Cover it with a bowl and let it rest at least 10 minutes. Flatten the dough slightly on an ungreased cookie sheet and then roll it out to a 12″ round. Try, at least–my crusts always come out oblong because the shape fits my cookie sheet better. I like to think it looks more rustic that way.

Bake the crust without toppings for 8-10 minutes. It will puff up and turn lightly golden. The puffiness will deflate, but if it bothers you, poke some holes in the dough with a fork before you bake it. Top the pre-baked crust with your choice of sauce, cheese, meat, vegetables, whatever, and bake at 400º for 25 more minutes or so. You’ll know it’s ready when the edges of the crust are golden and your cheese is bubbling and starting to brown. Cool slightly, sprinkle all over with grated parmesan, slice, and serve.

Some notes on sauce and toppings:
Because this crust is so light and thin, I like to brush it with olive oil and sprinkle it with chopped herbs and garlic. Traditional tomato sauce works, too, as long as you don’t smear it on too thickly. Some of my favorite topping combinations are:

chicken + zucchini + red onion
sausage + kale + mushroom
prosciutto + arugula + provolone
salami + mushroom
tomato + basil


A close companion

My baby rolled over by herself for the first time yesterday.

It had been a while since I’d been overcome by the weirdly beautiful, happy-sad weepiness that was a close companion throughout Lucy’s newborn stage. I’d find myself crying every time I looked at her too hard, which was every other minute. Yesterday it happened again, first as I was packing away a batch of too-small onesies and sleepers. And then when she rolled over…lord, help me. She’s practically a teenager.

Not yet, though. She’s going to be my baby for a while, and I am doing my best to sit in the moments with her and hold on. I rock and nurse her to sleep every night, and for naps, too, on the days I am home with her. Even though her feet dangle well off my lap now, and she is heavy, so heavy, when I stand up to lay her down, these quiet times in the darkened nursery bring me right back to the day she was born, every time. And she is my baby forever.

For naps, we listen to a CD of classical music. Track 3 plays. It is Verdi, When the evening becomes peaceful. As if on cue, she sighs and her little body goes limp with sleep. I rock her for a while longer, and watch her breath even and deepen until I am ready–or at least willing–to let her go.

Yesterday, while she slept, with the wind whipping wildly outside and lullabies playing softly within, I worked on lesson plans for next week and ate soup made from leftover Thanksgiving chicken. It was a comforting lunch, just right for the weather and the bittersweet events of the day.

IMG_2122

Chicken Noodle Soup

You will need:

2 tbsp olive oil, plus extra for finishing
3 carrots
3 ribs of celery
1 medium onion
3 or more cloves of garlic, minced
6 cups of liquid (stock, water, or a combination)
Several sprigs fresh herbs, chopped (thyme, sage, parsley, and rosemary work well)
1 bay leaf
Parmesan rind (optional)
2 cups cooked chicken, chopped or shredded
1/2 lb dry cavatappi pasta or other short noodles
Salt and pepper to taste
Fresh parsley to garnish

This recipe makes about 4 servings. The amounts are guidelines and can be adjusted based on your taste or what you have on hand. The Parmesan rind is a neat trick that adds a richness to the broth, but the soup is tasty without it.

Chop carrots, celery, and onions into 1/2-inch cubes. It is important that the pieces be about the same size so that the vegetables cook evenly. Heat oil in a heavy-bottomed stockpot over medium heat. Sauté the chopped vegetables until they are soft, 5-10 minutes. Season with salt. Add garlic and chopped fresh herbs and cook until fragrant, about 30 seconds. Add the liquid and bay leaf to the pot and bring to a boil. Reduce the heat so the broth is simmering, add the Parmesan rind (if using), and chicken and cover. Simmer for a while, until you are ready to eat. Uncover the pot and taste for seasoning. Add salt and pepper to taste and turn up the heat to bring liquid back to a boil. Add the noodles and cook according to package directions or until they are the consistency you like. Ladle into bowls, garnish with a drizzle of olive oil and some fresh parsley. I like a little hot sauce, too. Serve with crusty bread and butter or a handful of saltines.


In non-traditional fashion

I love Thanksgiving. I always have. I love spending a whole day in the kitchen and the way the house smells like turkey at 9 in the morning. I love having the parade/dog show/football on TV in the background as the day progresses. (I actually hate the parade, especially the musical numbers. It is part of the story of the day, though, so I am fond of the idea of it.) I love making hand turkeys to put on the wall and setting the table with flowers and candles. Even though some (most) Thanksgivings, I end up sweaty, crabby, and covered in flour by the time we are actually ready to eat, every year I look forward to all of it: to the prepping, cooking, stirring, baking, drinking, displaying, chatting, laughing, Scrabble playing, and finally, the feasting.

Lucy’s first Thanksgiving was two days ago. We ended up celebrating in mostly non-traditional fashion, walking to my in-laws’ house for midday ham and green-bean casserole and then heading home to cook and eat late-night roasted chicken and potatoes. My family was away, visiting my collegiate sister in Arizona. It was a different year; fitting, maybe, because having a new baby makes everything different. And though it was strange and a little sad to skip the familiar experience in my mom’s kitchen, a song I know so well, it also felt good to do our own thing. We are starting our own rituals as a young family, building on what we know and making new traditions as we go.

And yet! No matter what traditions we start for ourselves, there will always, always be apple pie at Thanksgiving. I know I promised a covered dish when last we spoke, but trust me: this pie is so much better.

IMG_2058

I have been making apple pie for Thanksgiving for as long as I can remember. I am pretty awesome at making apple pie. In fact, Mike claims it was my apple pie that won his heart 9 years ago. This year’s pie might have been my best ever. I tried out a new crust recipe and a new apple combination for the filling, and it was perfect.

Apple Pie
adapted from the Betty Crocker cookbook

You will need:

2 pre-made, all-butter pie crusts
I doubled this recipe from Elise Bauer at Simply Recipes. Don’t forget to increase the sugar amount per the instructions for a sweet preparation. Also, this recipe only makes one crust so make sure you double it. This crust was delicate, temperamental, and ugly. It was also perfectly flaky and had great flavor. I am something of a crust snob, and this recipe makes some of the best I’ve had. It’s my new go-to crust.

8 tart, firm-fleshed apples. I used Pink Lady apples, with a couple of Fujis thrown in for sweetness. Granny Smiths are traditional. Gravensteins would be sublime, if you can find them.
1/2 cup white sugar
1/2 cup brown sugar
1/4 cup flour
1 tsp cinnamon
1/2 tsp nutmeg (freshly grated if you have it)
1/4 tsp ground cloves
Pinch salt

Preheat oven to 425º. Peel and core the apples. Slice them very thinly, as thinly as you can. This is important! If you cut the apples into thick chunks, they won’t cook all the way through. Thin slices give you soft layers of cooked apples and maximize surface area for flavor to cling to.

Put the apples in a large mixing bowl. Add the sugars, flour, spices, and salt to the apples and mix carefully, using a folding motion. Try to avoid breaking the apple slices. The sugars will dissolve in the juice from the apples, leaving a beautiful, cider-flavored syrup coating each slice. Let the apples hang out and get juicy while you roll out the pie crusts.

Line a 10-inch pie plate with one rolled-out crust. Pour in the apple filling. Cover the filling with the other crust. I like to use a whole crust, but a lattice on top would be pretty, too. Seal and flute the edges. Cut several slits in the top crust to allow the filling to vent while baking. Cover the edges of the crust with aluminum foil. Lightly sprinkle sugar over the top of the pie. Bake for 30 minutes. Remove the foil and bake for 15 additional minutes to cook the edges. Allow the pie to cool slightly before serving it. Apple pie is delicious at room temperature, but even better warm with vanilla ice cream. It is also good with coffee for breakfast the next day.